1. What is the DigPacks Asset Booker?
An application your organisation can use within Microsoft Teams to book assets such as desks, meeting rooms, car parking spaces, pool cars, specialist equipment. You define what and how the assets can be booked.
This application was developed by DigPacks to provide a solution to this much requested scenario within NHS organisations.
Watch this short video for a brief overview.
2. Prerequisites
Organisations on the NHSmail central tenant will need to prepare the following prerequisites before beginning the installation of the Asset/Desk Booking application.
It is also recommended your asset booking admin team(s) watch the features video to understand the applications functions to ensure you have the most suitable setup for your organisation’s needs.
Features video:
1. The account used to install the application is the account which communicates with users of the app. It is advisable to setup a specific account for this purpose, named Asset Booker; Desk Booker; Org Admin etc.
a. You can discuss with your IT Local Administrator about having an account created.
b. The account must belong to a User Policy with the minimum of these applications enabled:-
- Common Data Service (Dataverse)
- Common Data Service for Teams (Dataverse for Teams)
- Microsoft Teams
- Microsoft PowerApps
- Microsoft Flow (Power Automate)
- SharePoint (includes OneDrive)
2. The account installing the app must be an owner of the team where the Asset Booker is installed.
3. Have a Microsoft Teams team where the Asset Booker will be installed.
a. If you do not have a Teams team already available, please follow this link to the guidance. You will most likely need to raise a ticket with your IT Support Team.
b. N.B. All staff who will use the Asset Booker to create and manage their bookings must be added as members to this team. Please see guidance on adding AllUsersGroup.
4. Decide whether you will install the app into the General channel of this team, or into another channel within the team.
a. If into another channel then ensure the Teams channel is created ahead of installing the app.
5. Copy the URL of the Teams team to use during installation.

6. The team will need the Power Apps app adding to create the Power Environment which will host your Asset Booker. Section 3. “Setup Power Environment and install Asset Booker” steps 1-5 below provides the necessary guidance.
7. Download the latest app solution zip file of the Asset Booker application. DigPacks download link. Please sign in with your NHSmail Shared Tenant credentials, i.e. your.name@nhs.net
8. You will need the URL of your company logo, this must be publicly accessible.
a. may need to discuss with your corporate communications team.
b. To use the NHS lozenge you may use this link for the NHS lozenge.
9. You will need your company’s primary colour hex code.
a. You may need to discuss with your corporate communications team.
b. To use the NHS Blue use #005EB8
c. See this link for more NHS colours NHS Identity Guidelines | Colours (england.nhs.uk)
10. If you will be using the approval feature then it is recommended to setup a dedicated Team for the the Approval Team and add these users who will be approving bookings.
a. NB. Only Standard channels can be selected for approvals, not Private or Shared channels.
3. Setup Power Environment and install Asset Booker
1. Within Microsoft Teams login with account that will be used to install the app, as per #1 of prerequisites.
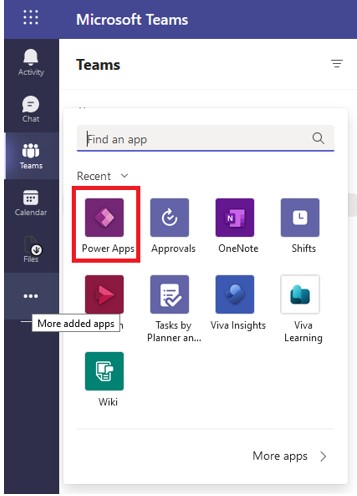 2. Click on the Power App icon from the sidebar, you may have to click the ellipsis icon to see more.
 3. Click on the ‘Build’ tab from the top.
4. Select ‘+ Create’ from the bottom left of the window and then choose your team that app should be installed under. As per #3 in the prerequisites section.
5. Click on the ‘Create’ button. If this is your first time creating an app under this environment, you may have to wait until the environment is prepared.
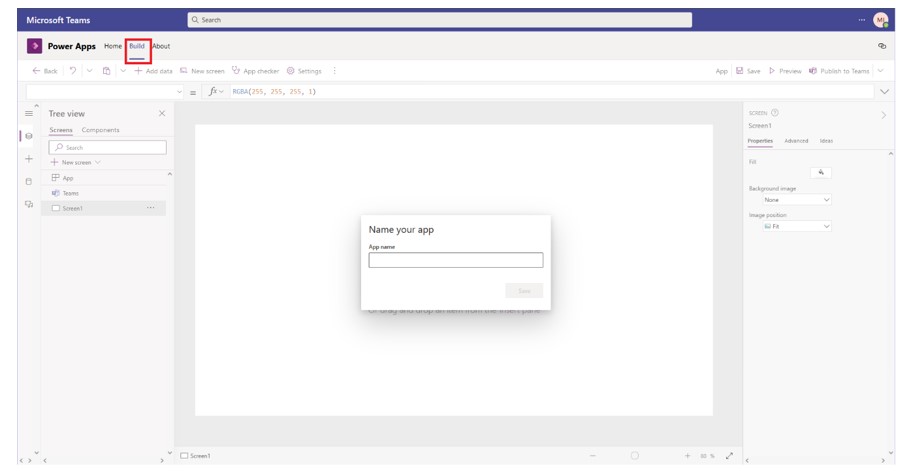 6. Once the build an app screen is displayed, asking to name your app, click on the ‘Build’ tab once again to exit this screen.
 7. From the Power Apps in Teams screen, ensure you are in the correct Teams environment, and then click on ‘Import your solution’.
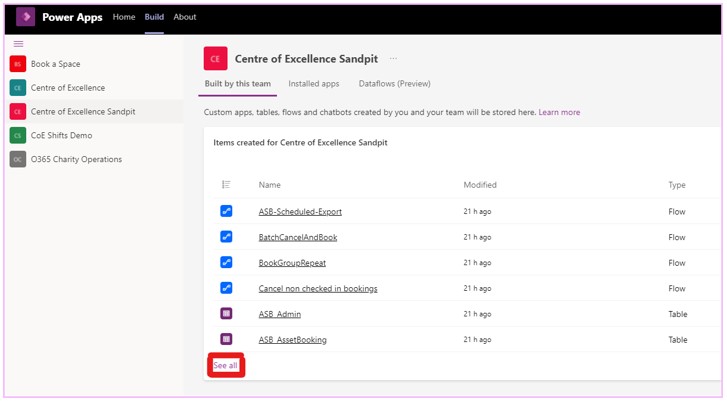 7.1 If you already have items created, click “See all” at the bottom of the item list and then from the top menu bar choose “Import” “Import Solution”
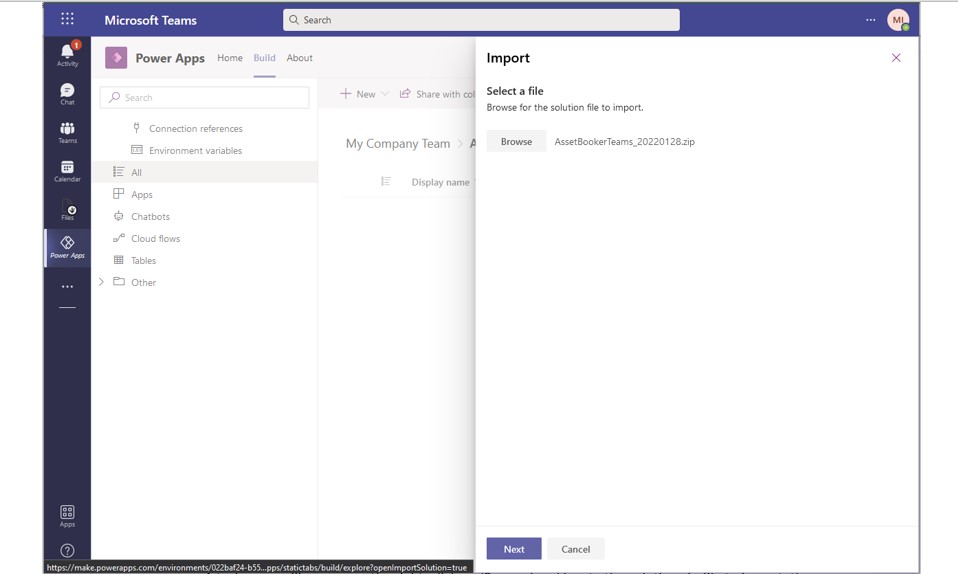 8. A task-pane will appear on the right, click on ‘Browse’ and locate the solution zip file to import, then click ‘Next’.
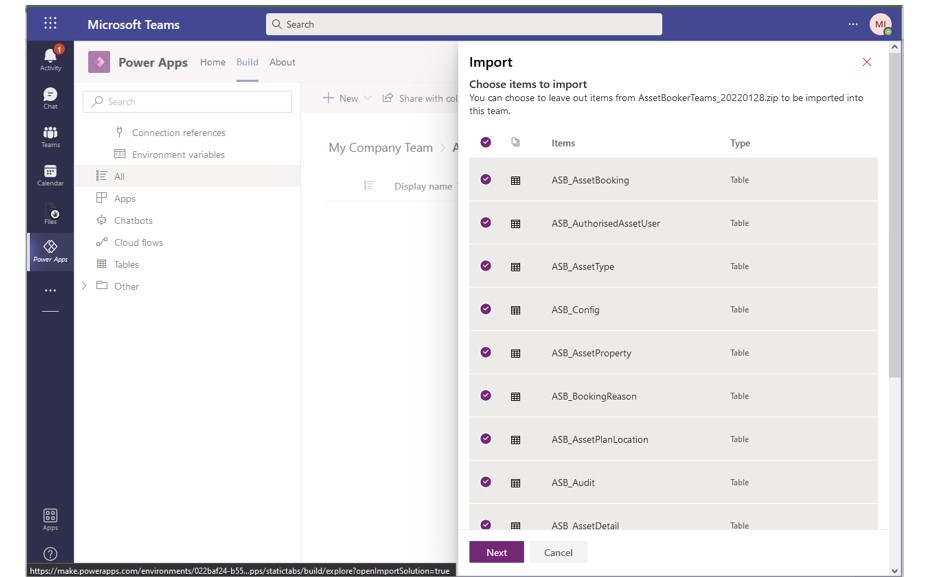 9. Leave all items selected and click ‘Next’. (This could take a few minutes).
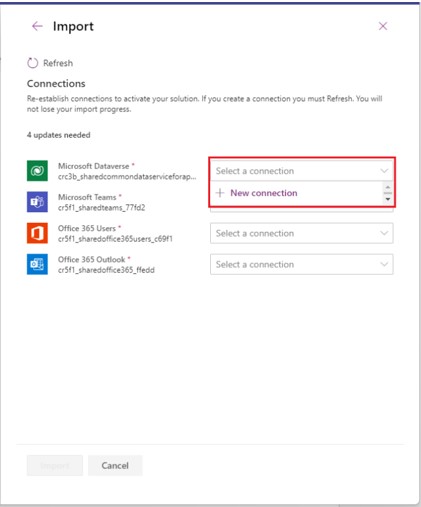
10. For the following part, you will be creating required connections to the services listed. Please follow the following step for each connection:
10.1 Starting from the top, select the drop down and click on ‘+ New connection’ (if your name does not already exist in the list).
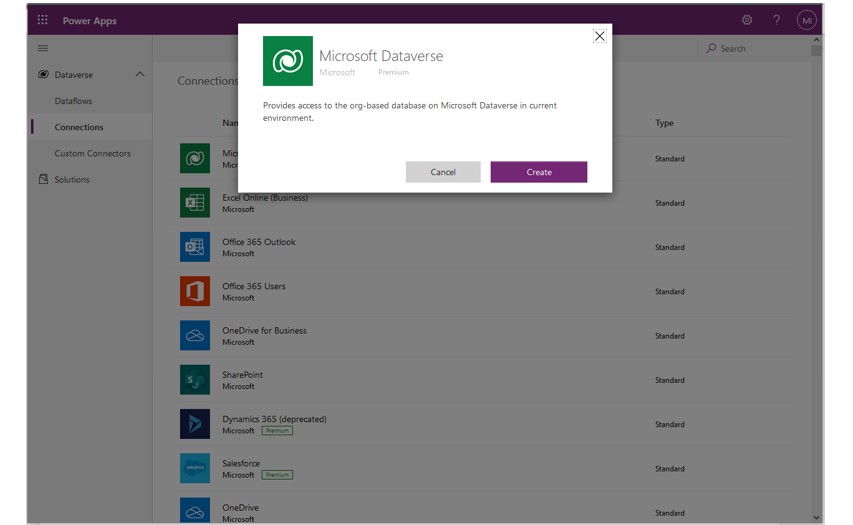 10.2 A browser or a tab will open and ask you to confirm to create the connection. Click on ‘Create’.
10.3 Once created, you can close the window/tab, go back, and click on ‘Refresh’.
10.4 Follow the same process until each connection has been selected with the correct account details.
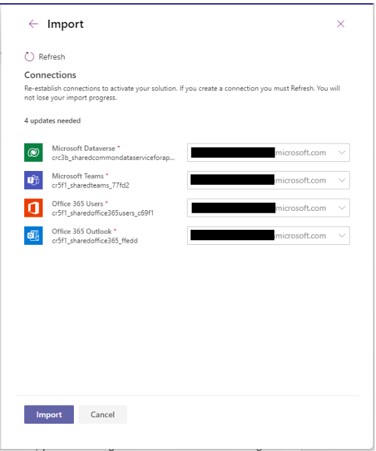 11. Click on ‘Import’.
 12. You will then see a grey status message at the top stating “Currently importing customizations from file “FileName.zip”” This will take several minutes.
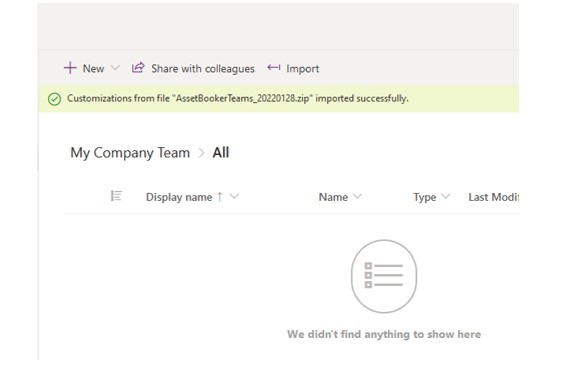 13. Once the application has been imported and installed, you will see a green success notification along the top of the window. This will take several minutes.
14. You will now need to click on the ‘Build’ tab again to proceed with the installation.
4. Installing application settings
Before running the app for the first time, we need to configure some of the settings first which is done through the following step.
* Please note, this step is ONLY required during the first installation of the Asset Booker app.
1. From the screen with the success notification, click on ‘Build’ along the top, select the team you just installed the solution in and
a. Select “Built by this team”
b. then See all
2. Click on the ‘Cloud flows’ tab from the menu on the left.
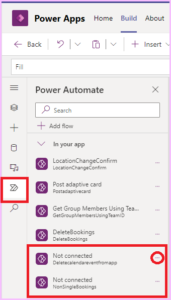
3. You should now see the following screen.
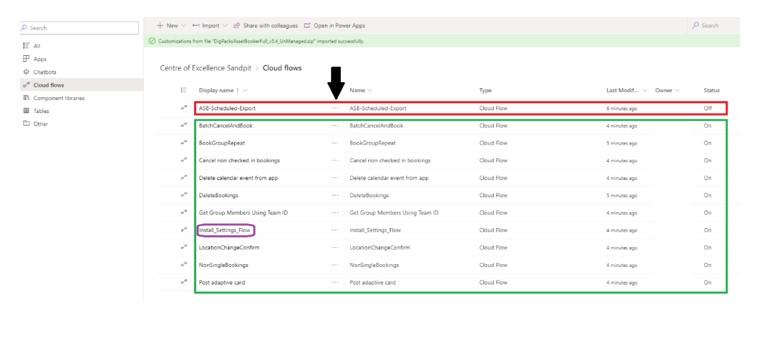 a. Please take note of the ‘Status’ for all Cloud flows.
b. Ensure that ASB-Scheduled-Export is Off, click the three dots and select ‘Turn off’
c. Ensure all others are On, click the three dots and select “Turn on”.
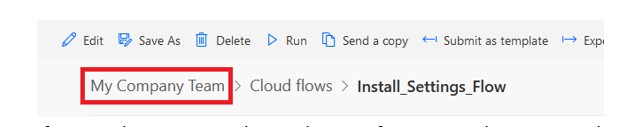
4. Click on the name of the flow “Install_Settings_Flow” shown in purple above.
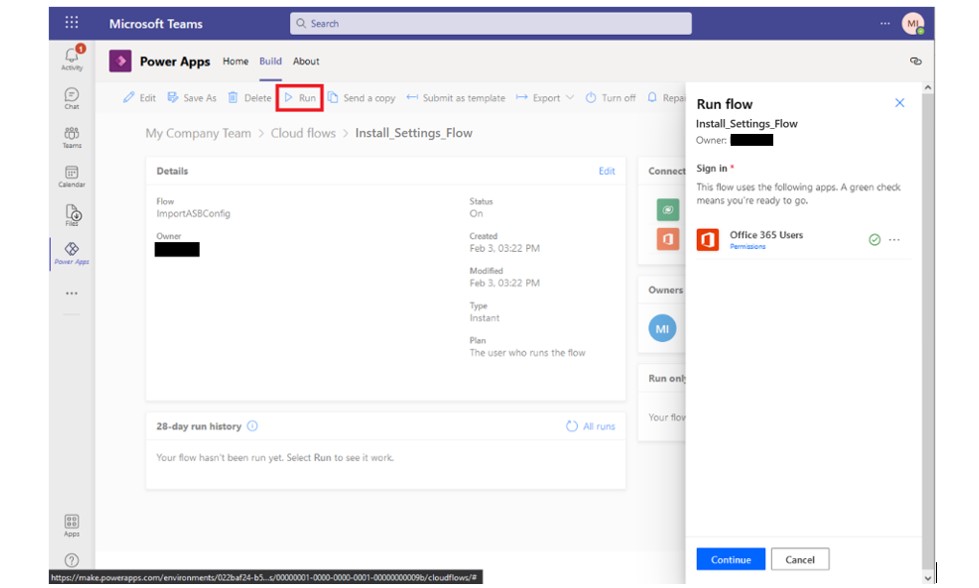 5. Now click on ‘Run’ from the toolbar along the top, and then ‘Continue’.
 6. Search for the person who will be an Administrator for the Asset Booker and then click ‘Run flow’.
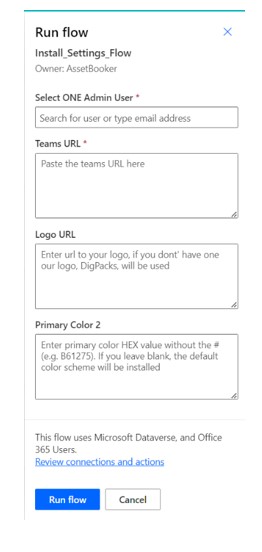
a. Admin (required): Select a person from the People directory to make an Administrator.
*Please note, you will be able to add more Admin users directly from the app later on, only add one person at this stage (Ideally yourself).
b. Teams URL (required): Paste the Teams URL, as per 2.5 above
c. Logo URL: Please paste in the URL of your company logo.
If you do not have a logo url, please use the NHS lozenge https://support.nhs.net/wp-content/uploads/2023/02/NHS-Lozenge.png
d. Primary Colour:
Enter the HEX value of a primary colour for the app.
Only enter the HEX value, without the ‘#’, to use the NHS Blue use #005eb8
7. Click ‘Run Flow’ and click ‘Done’.
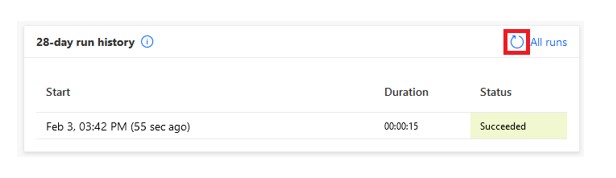 8. Please wait for the process to complete. To check progress, click the Refresh icon as indicated.
 9. Click on the name of your ‘Team’ along the top to return.
10. If you wish to rename the application from DigPacks Asset Booker to a more appropriate name for your organisation use do the following:
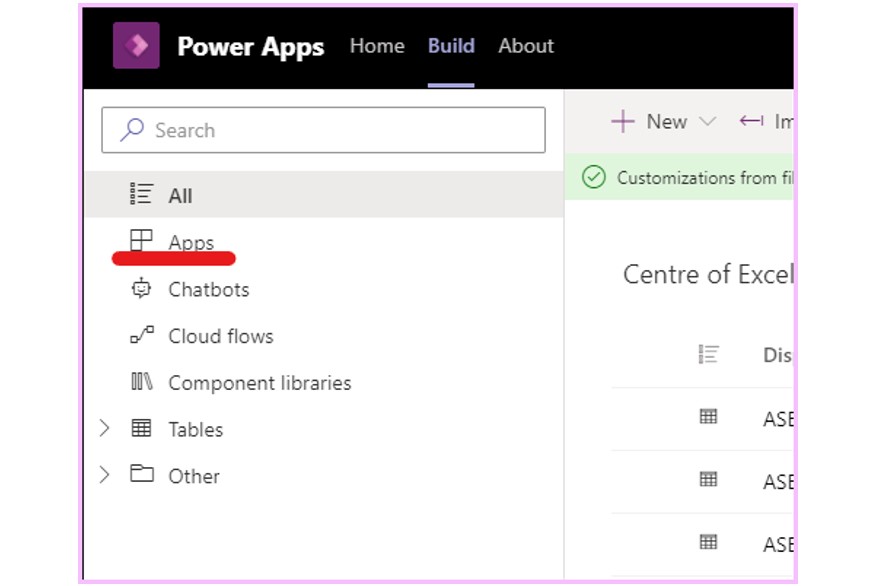 a. Click Apps on the left
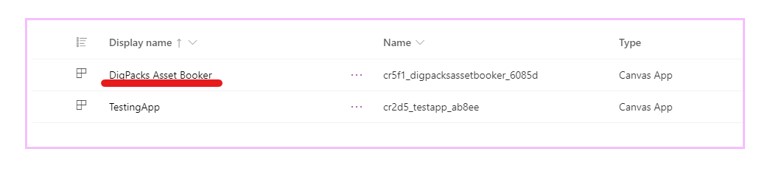 b. Click the DigPacks Asset Booker app name to open the app in Power Apps. This may take a few minutes to load.
 c. Select the Settings menu in the top row. It may be in the “…” more options menu.
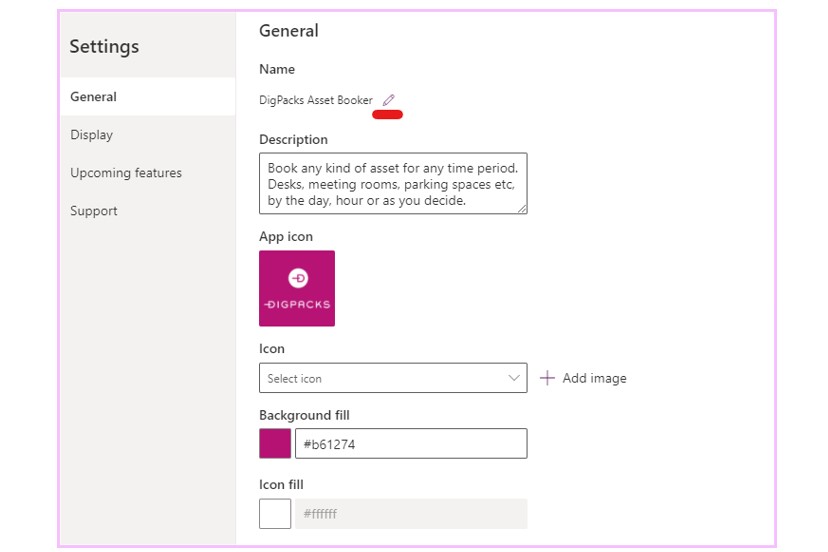 d. Click the pencil icon next to the name and enter the relevant name, select save, then click the “x” to close this settings menu.
 e, Click the save icon top right and then the back arrow in the top left to Save the changes made.
5. Initialising application
Before the app can be made accessible to all members of the team, it needs to be added to a Team.
 1. Select ‘Apps’, then click on the three dots and select ‘Add to Teams’.
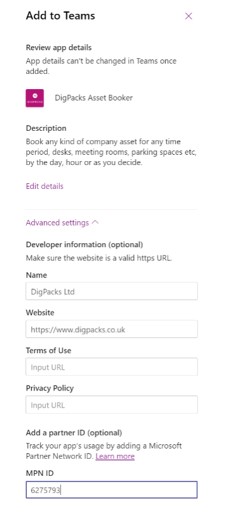 2. Click on ‘Advanced settings” and enter in the information from the screenshot below in to the fields and click on “Add to Teams”
3. On the following screen, select the drop-down icon, select “Add to a team”, and find the Team you installed this application in. Click on ‘Set up a tab’ button.
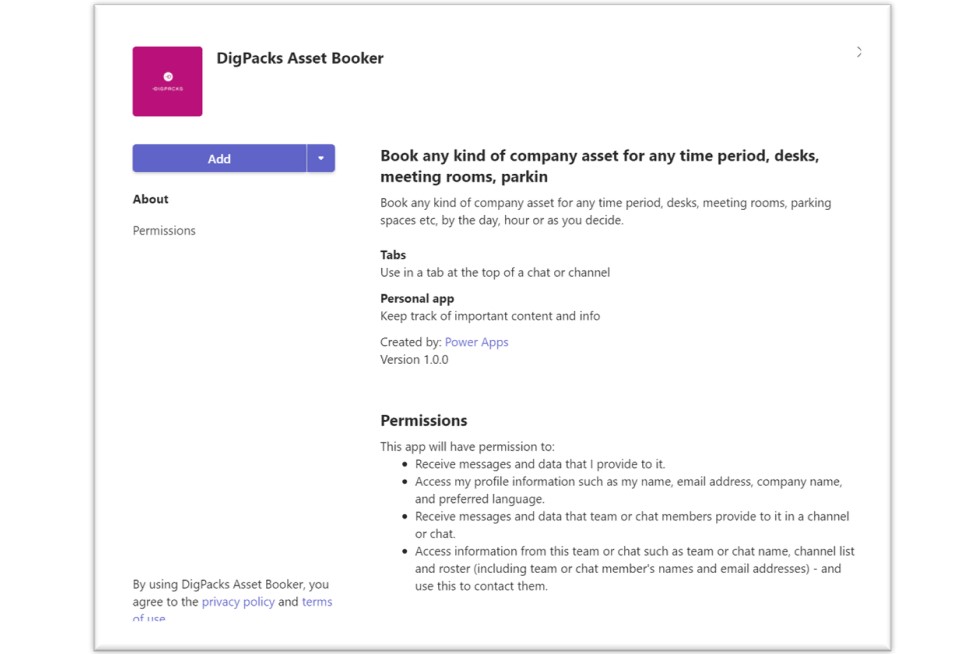 *Please note, you must ensure the same Team is selected as the installation for the app to work.
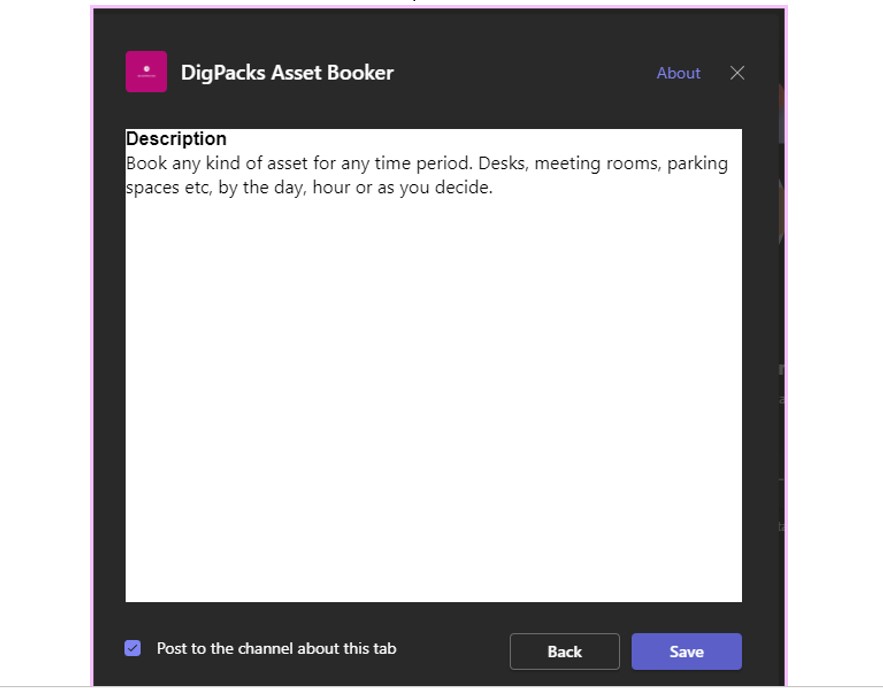 4. You will be shown the New Tab screen. Uncheck the “Post to the channel about this tab” if you do not want to alert the channel. Then press “Save”
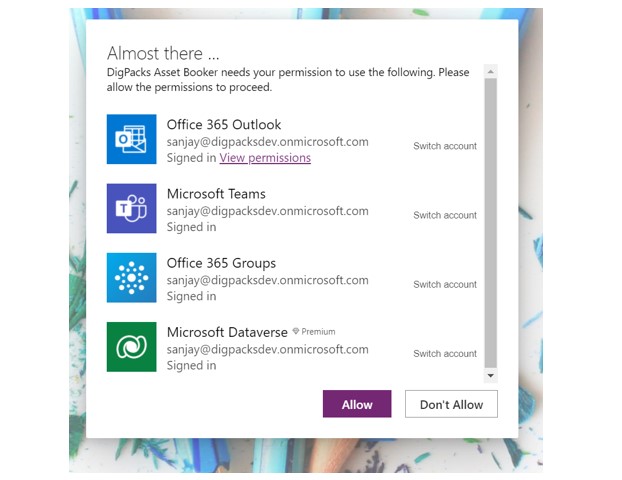 5. The application will launch and prompt you to click on ‘Allow’ to continue
6. You will notice that the Asset Booker application now appears as a tab, which will be accessible to all your team members
 a. You can click the drop down arrow of the tab to rename, if required.
6. Video Guidance for Admins and Users
To setup the application data please follow the guidance provided in this setup video.
Asset Booker Setup
The ability to backup your application data is possible through the Backup and Restore functionality, it’s recommended once you have configured your asset information that you create a backup CSV should you need to restore at any point – https://support.nhs.net/knowledge-base/digpacks-asset-booker-backup-and-restoration/.
For guidance on how to use the application to create and manage your bookings please see the video guides available on the DigPacks site via this link https://digpacks.co.uk/asb-video-guides.
7. Troubleshooting
Check the Power Automate elements within the Power App are correctly configured.
- Login with the account that runs the DigPacks Asset Booking app, as per 2.1
- Within Teams open Power Apps and open the Build tab
- In the Built by this team tab, select the “see all” option
- In the left hand menu select the Apps filter
- Click the name of the DigPacks Asset Booker app (your org may have been renamed when installed), wait for the Power App to open, this may take a few minutes
- In the left menu select the Power Automate section
- You will now see the listed flows, for any Flows named “Not Connected” click the “…” and choose refresh
- This will reapply the connection and solve the issue
| Last Reviewed Date | 01/03/2023 |